I recently purchased a Speedball linocut kit and tried my first linocut blockprint. It was a huge trial and error. I think it went rather poorly if I’m being very honest. Since then, I have worked at it and learned more about the tools, techniques, and materials needed to learn to linocut.
My first linocut was done on a whim. I purchased the Speedball Super Value Block Printing Kit (affiliate link…see my disclosures) and took it home and tried to jump right in. After opening the box I knew I did not really have to watch any tutorials. Here’s why:
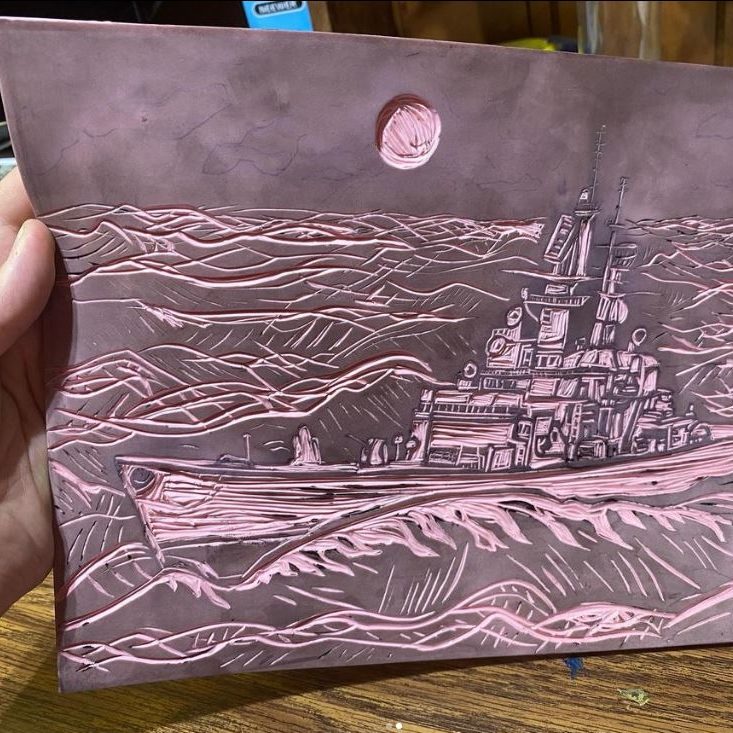
The Block Printing Kit comes with several items. First, a speedy-carve block. A “Block” is what printmakers call the thing you’re about to cut. The speedy-carve block looks like a pink eraser but bigger.
Next is the carving tool. It’s a little confusing, you have to unscrew the bottom to gain access to the three different heads. Make sure the pointy side is facing outward when you screw it into the top.
The brayer looks like a small handheld rolling pin.
Finally, the water-based speedball ink which comes in a standard paint tube.
Cutting the Lino Block
The best part about learning how to linocut is that linoleum is super easy to cut. Especially the Speedy-Carve Blocks. I liked the speedy-carve block so much I bought another one at the 9×12″ size for my second linocut project. When you cut the block, you’ll try the three different tools. One is big, one is medium sized, one is small…just like Goldilocks. For my first attempt I just improvised and made a quick sketch by using the carving tools. I wanted to get a feel for cutting.
To Cut
- Choose the size cut you want to do.
- If you want, draw a line on the block to follow for your cut. Remember, everything you cut off the block will appear as white when you print. So if you want a black line in the final artwork, you’ll want to cut around that area. It’s a little confusing sometimes!
- Put the cutting tool on the block starting where you want to cut. Holding it with one hand and I use my pointer finger to point towards where I want it to go. To steady the tool, use your other hand to hold the block very close and kind of guide the tool slowly forward, cutting into the block. With the Speedball Speedy Carve, you’ll have no problem keeping straight lines, but it’s best to get into good practice in case you want to try woodblock printing in the future (this was my next project!)
- Once you have carved it, be sure to clean off the block of the excess material before making your next cut.
Preparing to Print
This was a trial and error process. Printing it turns out is just as difficult as carving.
To Print
- First thing’s first – You need materials. The speedball ink that comes with the kit is acrylic based. It is considered difficult to work with by many of the printmaking artists in the community. BUT it will work for your first print! Just don’t expect PERFECT on your first time. This is about learning the basics. You’ll need Ink, Printmaking Paper (not watercolor or other types, it must be printmaking or mixed-media that does not have a rough surface), A Brayer and a piece of glass or flat plastic (I use a pink plastic clipboard)
- Put the ink on the glass and begin rolling it with the brayer. You want to really work the ink, so start vertical, then go horizontal, then vertical again, then diagonal, until the ink makes a tacky sound. Then it’s ready.
- Roll the ink onto the block – SUPER IMPORTANT – NOT TOO MUCH INK…it’s tempting to really pile the ink on that block, but actually you don’t need a huge amount of ink. Too much ink will splotch when you press it down on the paper, so a good even layer of ink is what you’re looking for.
- Put the paper over the inked block.
- Use your hand to press the paper down on the block. Being a proud weightlifter, I used ALL OF MY FORCE during this step my first few times. Truthfully, you just need even pressure, not much force, to make sure the ink is pressed on the paper. Some people use things called Barens to do this, but for your first time your hand should be fine. You can use a wooden spoon from your kitchen too if you like. Make sure you get all the corners and everything too.
- Lift up your paper and check your result. If you want, before you move the paper entirely, you can re-ink parts of the block that did not get onto the paper and try pressing again. That has saved a lot of time trying it again.
- Repeat the process! I bought some Newspaper Print to press several pages before I get to my nice paper, it helps the block get even ink throughout and helps you focus in on printing a good image.
Did you print following these instructions on how to linocut? NICE WORK! Let me know how it goes, comment below!